
I love creating pictures with my knitting, whether it’s with the use of texture or stranded colourwork motifs but also with intarsia. For some reason so many knitters have a serious aversion to intarsia, I think it’s possibly the thought of having to work with 20 different yarns at once that puts people off.
I really want to show you that intarsia can be fun, especially with simple designs that don’t require you to be working with numerous little balls of yarn at once, and I hope that this tutorial will help change some minds about intarsia.
This is the simple chart that I will be using throughout this tutorial:
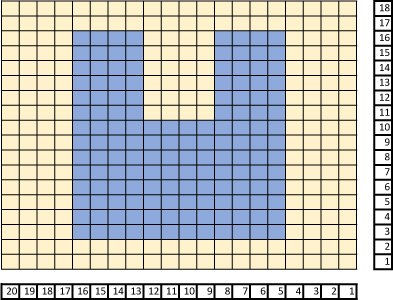
As you can see there are only two colours in this design, but there is more than one ‘section’ of each of the colours. A section is a separate area of colour, each section will need a separate ball (or bobbin) of yarn, before starting you will need to work out how many balls of yarn you will need to wind.
In the first part of the design there is 3 sections; 2 main colour and 1 contrast colour:
 In the second part there is 5 sections; 3 main colour and 2 contrast colour:

So in total you will need 3 small balls of main colour yarn and 2 small balls of contrast colour yarn.
Start knitting:
Having already worked 2 rows in MC (main colour) on row 3 you will K4 in MC, then join your first ball of CC (contrast colour) and K12 in CC, then join a 2nd ball of MC and K to the end of the row.
When you get to row 11 you will continue using the balls of yarn that you’re already working with but also add in two more. So K4 with current MC, K4 with current CC, join another MC ball and K4, join another CC and K4, then K to end with existing MC.
Changing to the next colour:
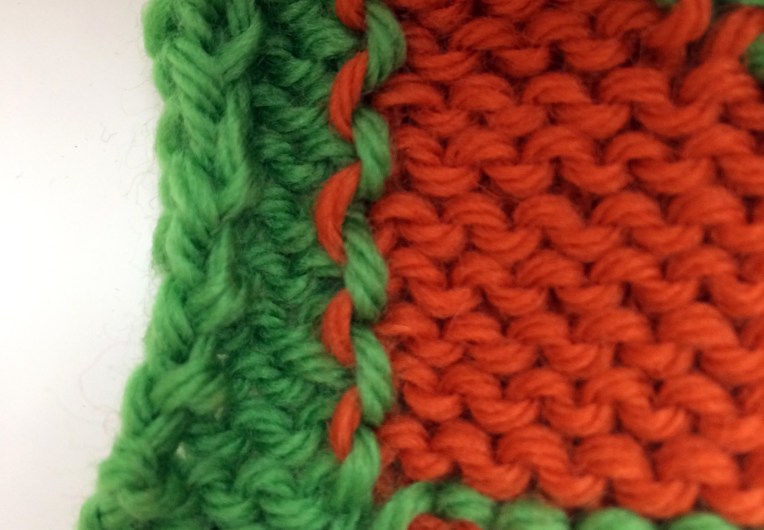
When you get to the point on a row where you change to the next colour it is important to remember to twist the two colour threads so as to not leave a hole in your knitting.
On a RS (knit) row bring the next colour yarn tail under the current yarn tail and then knit the next stitch.

On a WS (purl) row again you bring the next colour yarn tail under the current colour yarn tail before purling the next stitch.

By always bringing the next yarn under and around you are twisting the two colours and there will be no gaps in your knitting, the back of your knitting should look something like this:
There will be a few ends to weave in, but apart from that I think intarsia is quite painless. If you are now feeling super confident about this technique I have a new pattern coming out in the next couple of days which has a fun intarsia motif and is super cute.
